Well here they are! A selection of my latest photographs. It has been quite a journey but I am really pleased with these results. Trouble is I have sussed the bracelets but what of my bags and bunting, not to mention the necklaces!! I think it is back to the researching for more ideas.
Only Question I have now however is how many times should you use the same prop??
xx
Monday, 28 January 2013
New Images
Labels:
all things crafty,
bracelet,
charms,
earrings,
eco,
flowers,
green,
jewellery,
photographs,
plastic,
plastic bottles,
presents,
recycled,
recycling,
ReJenisis,
reused,
upcycled
Saturday, 26 January 2013
Taking better photographs
Photographs
Oh my have these given me a headeache!! Taking decent photos is such a must to showcase your work, I know this, but how on earth are you meant to achieve this??
My original attempts involved laying each piece in an IKEA wooden bowl, such an inexpensive item, but I loved the effect. Here is one of my first pictures ~
I still like it to be honest as it feels more natural, more in keeping with the recycling theme. That said however, the image doesn't show the bracelet to it's full potential, the flowers are lying flat on the surface where as they wouldn't do this on your wrist. I was also advised to photograph my pieces on white.
My next attempt was to use a white surface. I wandered around the house with my white scrapbook page, bracelet and camera in search of some decent light. The best room for light in undoubtedly the conservatory , although with the snow fall the roof was so dark that it didn't work too well. Here is my next attempt (actually there were several before this one but silly me deleted them, so I can't show you how awful they were!)
This just looks so bland and too dark.
So my next attempt involved lots of research, I found some fab blogs, these were great help not just by the articles but also demonstrating well taken images of their products.
I decided I needed to get a white vase, this would help give a little dimension, I also felt I needed a much larger piece of paper so that it will cover the surface area better and provide a vertical back drop aswell in one continuous piece.
I set up a small area in the conservatory, fixing a large length of paper to the windows so it draped down onto the table and covered the workspace. I then put my new little vase in the centre and experimented with positioning. Here is the results!
I like this, but the light was still a little dark. I don't own any exciting photoediting software so wasn't sure what to do, I could alter the brightness and contrast but that was about the most I could do.
Until ......
I was browsing and saw a post by All She Crafts, she had recently discovered an online photo editing software called Pic Monkey. What a program, I just inserted my pic, played around with some of the settings and produced this!!!
It is cropped as well as the colours brightened and saturation changed.
Here are the two images side by side so you can see the difference!
What do you think?? I am really pleased with the results. Next task is to find a vase big enough to showcase my earrings better!
Labels:
all things crafty,
beads,
bracelet,
crafts,
eco,
flowers,
gifts,
green,
jewellery,
photographs,
plastic,
plastic bottles,
presents,
recycled,
recycling,
ReJenisis,
upcycled
Thursday, 24 January 2013
Single colour, 3D effect, flat card
Butterfly card
This card is so lovely and looks 3D but in fact it is totally flat, ideal for sending through the post nowadays with postage restrictions and prices being as ridiculous as they are!
The other bonus of this card is that it requires so little, no tape or foam mounts, no papers or extra colours, there is no worrying if this will go with that! This card only uses one colour and the pattern effects only use a couple of stamps.
First off lets see what you will need!
I used the following ~
- Set of Stampin Up stamps, you could use anything however so why not experiment!
- Ink pad ~ one that doesn't dry too instantly as you will be doing several stamps between inking.
- Sticky notes
- Card blank
- Optional extras ~ daubers.

Step 1
First you will need to mask off a rectangle in the centre of your card. Mine left a 2cm gap around the outside. Square sticky notes are fantastic as you can line up the edges to get a neat angular shape.
Step 2
Once the area is masked take your stamp and ink it up, I have used a solid butterfly shape but it doesn't really matter what you use. The stamping you are going to be doing is to create a patten and texture to the card, you won't really notice what the image is. You will need to stamp your stamp several times around the unmasked areas of your card. I stamp at least three times before inking up again so that it adds texture and depth.
Here you can see how it is beginging to build up, I have stamped over and over again in the same areas.
Here is the completed border.
Once you take the sticky notes off you are left with a fantastic border.
Step 3
Next you will need those sticky notes again (don't forget to reuse the ones you took off). You need to cover the area you have just stamped, if you leave a little gap of white under the notes that is fine as it adds to the illusion of depth. You will also need to mask off another rectangle inside so you are left with a rectangular line on your card.
Step 4
You can choose how you do this next step. I used a dauber but you could use a tissue or finger or if your ink pad is a small one you could just wipe it over the unmasked area. You want this area to be a solid a colour as possible.
Step 5
Remove the sticky notes. Here is how my card looks at this point.
Step 6
Now it is time for you to be creative! I think simplest is best however so I just went for a couple of butterflies and some wording. If you weren't sending this card through the post then I would be tempted to add a punched butterfly on top. Here is my finished card.
Now all that is left to do is to write something lovely inside and send it to someone!
Monday, 21 January 2013
Crafty Snowday!
Good afternoon ~ Hope you are all wrapped up warm out of the cold, I just can't believe how chilly it is out there, I think snow would be much more fun if a little more heat were involved and a lot less ice!
It does make me laugh at how panicky people get when they think there is a chance they won't be able to get to the shops for a couple of days Thursday night, on a quest for buy a few essentials, I stumbled into Tesco. I admit I had totally forgotten it was due to snow that eve, and although I had heard rumours I didn't really believe it would happen! As I wandered the aisles I noticed how busy it was, there were far more staff out, filling the avenues of shelves with produce. It took a while for the penny to drop as to why it was so busy, the SNOW! Oh my word, the shop was heaving, people rushing around filling their trollies with necessities such as toilet rolls and beans. The thing that made me laugh however amongst all the madness was that of all the things for people to feel essential to buy in such a situation were custard tarts! I mean honestly, have you ever been stuck in the house for a whole day and thought you were going to slit your wrists if you could't get your hands on a custard tart? Well?? I confess that I have never felt this worried, I have never felt the need to sink my teeth into the custardy tart, in fact I have never really liked them. A strange thing over came me all of a sudden, the immediate need to own a custard tart! I must be missing out, All those shoppers must know something I don't, Maybe they have healing or calming powers, maybe they de-ice your garden? I will put it on my list the next time snow is forecast Toilet rolls, beans and custard tarts!
We did get out and enjoy the snow, (without any custard tarts) We even managed a walk through our local forest, it was so beautiful, and barely touched out there. It was tremendously inspiring aswell!
I managed a little crafting in between snowy adventures. Here is a SnowBob! He is so friendly and an awful lot warmer than a real snowman!!
I have also been busy creating AlphaBobs! They are learning to spell right now, here is a small band of Bobs who have managed to arrange themselves correctly without loosing their letters!
Believe me it took a long time to organise them!!!
If you would like to follow any Bob related news their facebook page is http://www.facebook.com/pages/The-Bobs/411736175550743
My latest creative achievement however is this fab bag! I love it! It is made from upcycling my daughters old jeans. She grew out of them years ago and i saved them as I loved the decoration so much, so glad I did. All the pockets are useable and it even has a large one inside. The strap is extendable and even the buckles are recycled!
xx
Monday, 7 January 2013
How to use Pinterest
Pinterest is a social network for creating virtual pinboards, and, I must admit, my new obsession! In fact their definition is that it ~
'lets you organize and share all the beautiful things you find on the web. People use pinboards to plan their weddings, decorate their homes, and organize their favourite recipes.'
I think that Pinterest becomes an extension of your personality, it demonstrates the things you like in a visual way which can inspire not only you but those who follow you.
Pinterest works in a similar way to face book, you have a main wall ~
Here is a copy of my wall. this is the starting screen and will be personal to you depending on the people you choose to follow, just like your wall on Facebook shows you what your friends have been up to. You can comment on these pins or repin them onto your own boards.
I think step 1 in this post however should be how to open an account!

Opening an account
1, First go to http://pinterest.com/ here you will find a button 'Join Pinterest' Click here and you will be taken to a new screen.

2, Here you will have the option to join using your Facebook or twitter ID or to use your email. ( i have recently had a bug issue with my account which I think was due to downloading an unofficial app on my phone and although I hadn't put in any login details it managed to locate my Facebook details and access my Pinterest account. My warning here is 1, don't download any apps unless official and 2, don't use your Facebook account as a login just in case.).
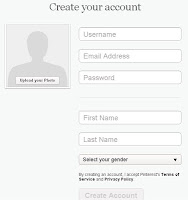
Select how you wish to register your account. I will use email here to demonstrate. You will need to make sure that your password is not weak or it won't let you register. An idea for your user name could be to use your business name! doesn't hurt to get it noticed as much as possible!
 4, Create your first board. This screen asks you to choose what sort of board you would like to create, I am going to select find craft ideas. Once selected it gives you optional board titles. If you wish to create your own from the start click on 'something else' this one produces a box for you to enter whatever title you wish. Once chosen then click 'create board'.
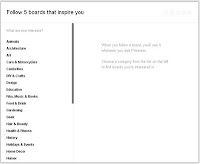
5. Here you will be asked to follow 5 boards that inspire you ~ When you select a category it will give you the option to choose a specific board. (this has been improved since I joined as you had to just choose a category and this filled up my wall with far too much stuff!). Select one of the boards and click follow. you will need to do this with 5 different boards (they don't have to all be in the same category, choose anything which interests you.)
Once you have selected 5 then click next.
6. You now have a page similar to the first image on this post, this is your homepage. The images you see are things people have pinned from the boards that you selected on the previous page.
So now you have an account! But now what??? I mean it all looks very pretty and vaguely interesting but what can I do now?...
Well the world is your oyster now!
Each picture has three buttons at the top ~ Repin ~ Like ~ Comment. If you like the the image and wish to keep it then press repin, if you want to just like it (like on facebook) click like and if you wish to leave a comment the ... you guessed it, click comment. Below the image are the details about the pin, the original pinner and the board you found it on, you will also see any comments which have been made about this image.
Now here is the clever bit!!!! of you click on the image and then click it again it will take you to the original website that it was pinned from! This way you can read about it or see a tutorial or watch a video, basically whatever the original source has to offer!
RePinning
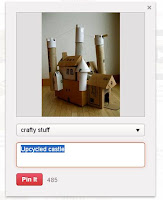 To Repin a picture click on the Repin button, here you will be asked where you wish to pin it. There is a drop down menu which will show all your boards and also gives you the option to create a new one. Select your choice and click 'Pin It' (If you wish to change what is written in the description field and then now is your chance, remember though that this will be what it is described as from now on, so if it is repinned it will stay like that unless someone else changes it. You have up to 485 characters to do this in). This Pin can now be found on the relevant board.
After you Repin you will be asked if you wish to follow a board which featured that pin, if you want select follow, if not move the curser outside the box and click and it will take you back..
Boards
Now you got a board automatically when you registered but you can create loads of them, you could have one for craft ideas, one for wedding plans, even one just put aside for pictures you have found of one armed lego men! You can also have up to 5 top secret ones which noone can see apart from you! (perfect for all those cunning plans!)

To access your boards select your profile picture in the top right of the screen.
Here is my new screen. Here you can see my profile information, my boards and how many people I am following as well as who is following me, (not many at the moment!)
To create a new board select an empty slot. If you want to browse through your board then select it and if you want to rename your board or grant access to someone else to pin on your board then click 'Edit'.
Searching
If you want to search something in particular then you need to head back to your homepage. Click on the Pinterest logo at the top of the screen. In the top left of the screen you will find a search box, pop in the thing you wish to search and it will bring up any boards, pins or even people with those words in it's name. You can then browse to your hearts content. You can follow people, follow boards, repin pins etc or just have a good old nose around.
UnFollowing
Say you have selected a board and no longer wish to follow it, maybe as the contents keep filling up your wall with things which don't interest you. Then you will need to go to your profile and select 'following' ( located on the bar below your profile) Here they have been a little sneaky! to unfollow a board or a person the button to do so is in a fade out grey and not immediately noticeable. In fact it looks like you can't select it, but you can, so do so!
Pin It
There is a wonderful Pinterest gadget which I wouldn't be without, the 'Pin it' button! It is totally ingenious. Basically what it is is a button that sits on your link bar in your browser. When you are browsing the net and come across an image or a site that you want to remember then you can pin it onto one of your boards. There are limitations however, you can't pin images from Facebook which I think it due to privacy (so I agree with that) you may notice some pages on Facebook however that have an option to pin pictures, my page http://www.facebook.com/ReJenisis has such a link if you want to go and have a look. So how can I get this amazing button??? well here is a quick guide.
1, First off go to the menu bar at the top of the screen and select about and select 'Pin it'.
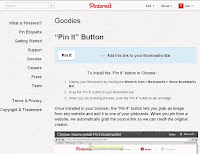 2, Once on this screen you will need to click and drag the pin button onto your bookmark bar. A button will appear! It's as easy as that!!
3, Well you have the Button but now what to do with it. Best way to try it out is to visit a website, if you have a blog why not go there. Click the 'Pin it' button you have just put on your bookmark bar and it will work it's magic. After a second or two a new page will pop up containing all the pictures you can pin. Here is a example ~
4, All you need to do is select the image you want to represent this web page or just the image that you want to remember. Like when you Repin a picture within the Pinterest site you are given the option to change the description and you can choose which board to pin it to!
So that is about it! I think! Everytime I wrote something about Pinterest I kept remembering something else, there are so many possibilities so just explore. You can pin all the images of things you have created and once you have a few followers you will find that they will see each pin you place.
A few things I have found ~
- People who are interested in your products will also want to know a bit about you, don't just post about one thing, be diverse, show your many sides! You will get more followers this way.
- Make sure if you are Pinning something that isn't self explanatory that you add instructions, or even comment about why you posted it as you will forget!
- People who follow me often have boards that I am interested in too so take a look around their boards as well.
- If you have a few friends on Pinterest then why not create a group board so you can pin things that you think may interest them! Not only will they be able to see the things you pin but they can pin on the same board too. To do this select the board you want to share and go to edit, here there is an option to add a friend, just add their user name and hey presto!!
- You can tell people on Facebook or Twitter about the pins you have added, this is great to advertise your stock and a few other bits but don't go crazy, there is nothing I hate more than a wall filled up with one persons pictures and anecdotes!
I am sure there is so much more I could say, but not sure I can think of it right now! So far this (what was meant to be a quick thing) has taken me the best part of 4 hours (interrupted only by a waking baby!) so if I think of anything I will post later.
I do hope this has been of some help to you and that you take the plunge and join me on Pinterest as http://pinterest.com/bouncytigglet,
Happy Pinning!!
Jen xx
Subscribe to:
Posts (Atom)


.JPG)


